
Introduction
Spring is a season overflowing with vibrancy, renewal, and inspiration. As the days grow longer and flowers bloom, a sense of creativity fills the air, making it the perfect time to express yourself through nail art. There’s something incredibly satisfying about transforming your nails into little canvases, reflecting the beauty of springtime. Doing nail art at home not only allows you to save money but also gives you the freedom to personalize your designs to match your unique style.
In this article, we’ll explore a variety of spring nail art ideas that you can easily create at home, ranging from floral patterns to modern geometric designs. Whether you’re a beginner or have some experience, these techniques will inspire you to have fun with your nail art while celebrating the charm of spring.
“Creating a cozy reading nook is all about maximizing comfort in a small space. It’s about intentional design that serves both function and feeling.”
– Interior Design Magazine
Essentials for Spring Nail Art
Before diving into the creative process, it’s essential to gather the right supplies. You’ll need the following basic nail art tools:
| Supplies | Purpose |
|---|---|
| Nail Polish | Base colors and designs |
| Dotting Tools | For creating dots and floral designs |
| Nail Brushes | For detailed designs and painting |
| Top Coat | To seal and protect the design |
| Cuticle Oil | To nourish and maintain healthy nails |
Beyond tools, preparing your nails is crucial for a flawless application. Start by filing and buffing your nails to create a smooth surface. Don’t forget to tend to your cuticles; applying cuticle oil can make a significant difference in the overall appearance of your nails.
When it comes to color palettes for spring, think of soft pastels and floral hues that embody the season’s essence. Consider shades like pale pinks, mint greens, soft yellows, and lavender. For those looking to elevate their designs, optional tools such as stencils and nail tape can facilitate more intricate patterns.
Floral Designs: Capturing Spring Blooms
Floral patterns are perhaps the most beloved spring nail art designs. From delicate daisies to vibrant tulips and serene cherry blossoms, these motifs capture the essence of the season beautifully. To create a simple floral design, you can use dotting tools and follow these easy steps:
1. Start with a base coat in a soft color, such as light pink or baby blue.
2. Using a dotting tool, create small dots in a circular pattern to form the petals of your flowers.
3. Add a tiny dot in the center of each flower for added detail.
4. For leaves, use a small brush or the dotting tool to create leafy shapes surrounding the flowers.
When choosing colors, aim for complementary shades. For instance, pair soft pink with a pale green or a lavender with a light yellow.
Consider creating accent nails with floral designs on one or two fingers while keeping the others a solid color. This technique adds a touch of whimsy without overwhelming your look.
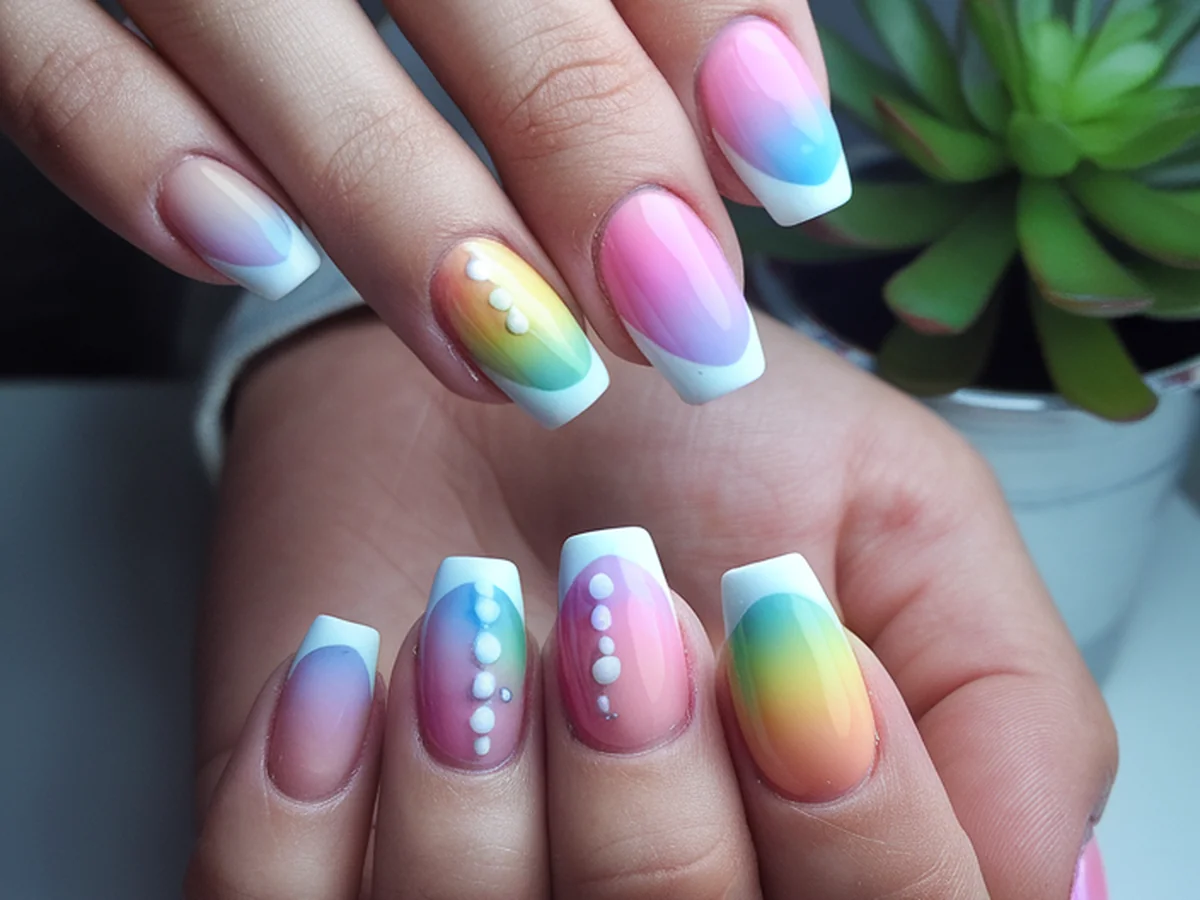
Pastel Ombre: A Soft Spring Gradient
The ombre technique is a stunning way to embrace the soft hues of spring. The gradual blending of colors creates a serene and artistic effect on your nails. Here’s how to create a lovely pastel ombre:
1. Begin with a base coat of a neutral color, such as white or nude.
2. Choose two to three pastel shades that blend well together, like mint green, lavender, and soft yellow.
3. Using a makeup sponge, apply the first color at the tip of the sponge and the second color at the bottom.
4. Dab the sponge onto your nail, moving it up and down to blend the colors seamlessly.
5. Repeat the process until you achieve the desired intensity, then finish with a glossy top coat.
For a spring ombre, consider combinations like peach and mint or lilac and pale pink. The key is to ensure the colors transition smoothly for that dreamy, soft gradient effect.
Geometric Patterns: Modern Spring Vibes
If you’re looking for something more contemporary, geometric patterns can add a modern twist to your spring nails. These designs can be bold and eye-catching while still embodying the lightness of the season. Follow these simple steps to create geometric designs:
1. Start with a solid base color of your choice.
2. Use nail tape to create lines or shapes on your nails. You can arrange the tape in triangles, stripes, or even chevrons.
3. Paint over the tape with a contrasting color and let it dry completely.
4. Carefully peel off the tape to reveal crisp lines, and finish with a top coat.
To achieve that quintessential spring feel, consider color combinations like pale yellow with soft grey or mint green with coral. The clean lines of geometric patterns make them an excellent choice for those who prefer a more minimalist aesthetic.
Watercolor Effect: Artistic Spring Nails
The watercolor effect is a fantastic way to achieve an artistic and ethereal look on your nails. This technique mimics the fluidity of watercolor paintings, allowing for a soft and dreamy design. Here’s how to create the watercolor effect:
1. Start with a base coat of white or any light shade to help the colors pop.
2. Select two or three vibrant nail polish colors that complement each other.
3. Using a small brush or a sponge, apply the colors in random strokes on your nails, blending them as you go along.
4. To enhance the effect, you can add a small amount of clear polish to your brush or sponge, creating a more translucent look.
5. Finish off with a top coat for durability.
Mixing and layering colors is key to achieving depth in your watercolor nails. Designs can be abstract, or you can incorporate floral shapes for a more structured look, adding a unique twist to your spring nail art.
Nail Art using Stickers and Decals
If you’re short on time or want to create intricate designs without the hassle, nail stickers and decals are your best friends. They’re incredibly convenient and come in a plethora of spring-themed options. Here’s how to use them effectively:
1. Begin with a base coat of your chosen color.
2. Once dry, peel off the sticker or decal and carefully place it on your nail.
3. Press down firmly to ensure it adheres well, and you can seal it with a top coat for longevity.
For spring themes, look for stickers featuring butterflies, flowers, or even abstract patterns. You can find them at beauty supply stores, online retailers, or even create your own using printable decal paper.
Using stickers allows you to mix and match designs effortlessly, making it easy to achieve a polished look without extensive painting skills.
Accent Nails: Making a Statement
Accent nails are a fun way to add personality to your nail art while keeping the overall look balanced. An accent nail is typically a single finger on each hand that features a different design or color, providing a focal point.
Consider these creative ideas for spring-themed accent nails:
- Decorate one nail with floral art while keeping the others a solid color.
- Use glitter or metallic polish on one nail to add some sparkle.
- Create a geometric design on your accent nail while the rest remain a soft pastel.
When coordinating colors, ensure that the accent nail complements the base colors to maintain harmony. For instance, if your base is a soft lavender, a glittery gold or floral accent would beautifully tie the look together.
Tips for Long-Lasting Spring Nail Art
To ensure that your spring nail art lasts as long as possible, follow these essential steps for prepping your nails:
1. Always start with a clean, dry nail bed. Remove any old polish and wash your hands thoroughly.
2. Apply a base coat to protect your nails and help the polish adhere better.
3. Finish with a quality top coat to seal your design and add shine.
Aftercare is also vital for maintaining your nail art. Moisturize your hands and nails regularly, and avoid exposing your nails to harsh chemicals. If you notice any chips or wear, you can touch up the design with a small brush and some polish.
Conclusion
As you embrace the beauty of spring, let your nails reflect the season’s charm through creative nail art. Whether you choose floral designs, pastel ombre, or modern geometric patterns, the possibilities are endless. The joy of creating nail art at home lies in the freedom to experiment and personalize your designs.
Don’t be afraid to try out different techniques and make the designs your own. Share your creations on social media and engage with the vibrant nail art community. Celebrate spring by letting your creativity blossom through your nails!
Frequently Asked Questions
What are the best colors for spring nail art?
Spring nail art typically features soft pastels and bright floral hues. Colors like pale pink, mint green, lavender, and light yellow are popular choices as they reflect the freshness and vibrancy of the season. You can also incorporate metallics or glitter accents for added flair.
How can I make my nail art last longer?
To extend the longevity of your nail designs, start with a clean nail surface, apply a base coat, and finish with a top coat. Regularly moisturizing your nails and avoiding exposure to harsh chemicals can also help maintain your art. Touching up any chips with polish can keep your look fresh.
Can I use regular nail polish for nail art?
Yes, regular nail polish works perfectly for nail art! However, you may want to have some specialized tools, like dotting tools or brushes, to create more intricate designs. Experiment with different polishes to find the ones that work best for your desired look.
Where can I find nail art stickers and decals?
You can find nail art stickers and decals at beauty supply stores, online retailers, or craft stores. Additionally, you can create your own designs using printable decal paper, which allows for a completely personalized touch.
What tools do I need for nail art?
Basic tools for nail art include nail polish, dotting tools, nail brushes, nail tape, and a top coat. For more intricate designs, consider using stencils or specialized nail art pens. Investing in good-quality tools will make the application process easier and more enjoyable.