
Introduction
French nail art has long been celebrated for its classic elegance and refined simplicity. The timeless appeal of this style lies in its ability to enhance your natural nails while offering a polished look that suits any occasion. As we transition from the cold months of winter to the vibrant warmth of spring, the world around us begins to bloom with color and life. This seasonal shift provides an excellent opportunity to infuse your nail art with the playful spirit of spring, allowing you to express your creativity in exciting new ways.
Creating your own spring-inspired French nail art not only gives you the freedom to express your unique style, but it also saves you money compared to salon visits. DIY nail art is a wonderful way to engage your artistic side, providing a fun activity that can be enjoyed alone or with friends. In this article, we will explore the ins and outs of designing your own vibrant French nail art, focusing on the joy and creativity that comes with the process.
“Creating a cozy reading nook is all about maximizing comfort in a small space. It’s about intentional design that serves both function and feeling.”
– Interior Design Magazine
Understanding French Nail Art Basics
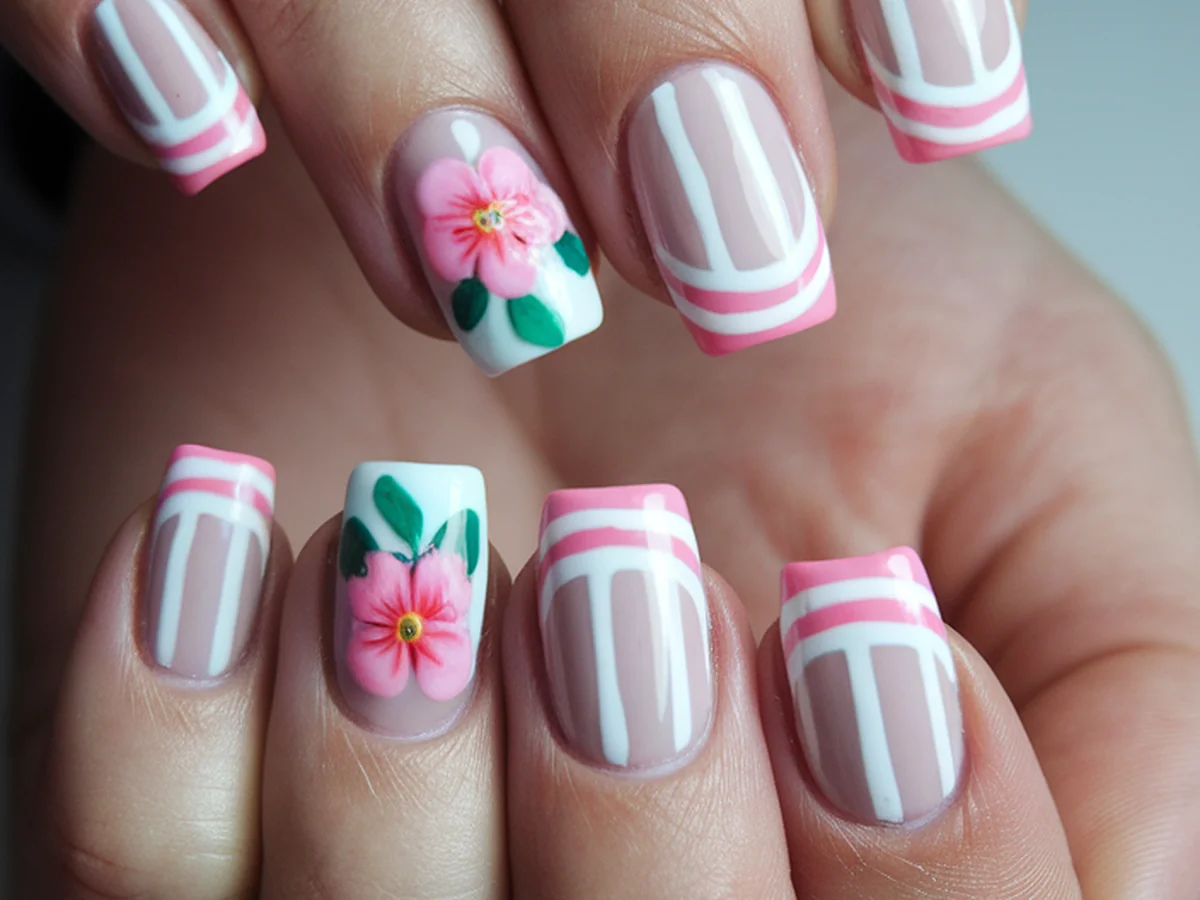
French nail art is characterized by its simple yet sophisticated design, typically featuring a natural nail base with a white or colored tip. The traditional French manicure embraces a neutral palette, often showcasing soft pinks, beiges, and whites that enhance the nails’ natural look. It’s a style that is both timeless and versatile, making it an excellent foundation for creative spring variations.
The shape and length of your nails play a significant role in achieving the perfect French manicure. While classic styles often feature oval or square shapes, you can experiment with different lengths and shapes to suit your personal style. The beauty of French nail art lies in its adaptability; you can easily incorporate seasonal themes and colors, transforming a classic look into something uniquely spring-inspired.
As you consider your design, remember that the possibilities are endless. With a few simple tweaks, you can take the traditional French tip and turn it into a canvas for your seasonal inspiration. Whether you want to add floral patterns, vibrant colors, or playful textures, the foundation of French nail art provides the perfect backdrop for your creativity to shine.
Essential Tools and Supplies for DIY Nail Art
Before diving into your spring-inspired French nail art, it’s essential to gather the right tools and supplies. Here’s a list of the basic items you’ll need for a successful DIY manicure:
| Tool/Supply | Purpose | Recommended Brands |
|---|---|---|
| Nail clippers | To shape your nails | Revlon, Sally Hansen |
| Nail file | To smooth edges | Glass, emery board |
| Nail buffer | To create a smooth surface | O.P.I., Essie |
| Nail polish | For base and tips | Essie, O.P.I., Zoya |
| Nail art brushes | For detailed designs | Born Pretty, Nail Art Boutique |
In addition to these basic tools, consider incorporating essential nail polish colors for spring. Pastel hues like soft pink, lavender, mint green, and baby blue are perfect for capturing the spirit of the season. Bright shades of yellow, orange, and coral can also add a lively touch to your nail art.
For those looking to elevate their designs, nail art brushes and dotting tools are essential for creating intricate patterns. Advanced supplies such as stencils, rhinestones, and nail tape can further enhance your designs, allowing you to experiment with various textures and embellishments. By gathering these tools, you’re setting yourself up for a successful and enjoyable DIY nail art experience.
Choosing Your Spring Color Palette
Selecting the perfect color palette for your spring-inspired nail art is crucial to capturing the essence of the season. Popular spring colors often evoke feelings of joy and renewal, making them ideal for this time of year. Think about soft pastels that resemble blossoming flowers, or vibrant shades reminiscent of sunny days. Colors like soft pink, light lavender, pale yellow, and mint green are excellent choices that can uplift your mood and enhance your nail art.
When choosing color combinations, consider creating a harmonious blend that balances both light and bright shades. For example, pairing a pastel pink with a bright coral can create a fun and eye-catching contrast. You might also explore complementary colors, such as lavender and yellow, to create an elegant yet playful look.
In addition to creating beautiful combinations, think about incorporating seasonal themes into your nail art. Floral patterns, butterflies, and even geometric designs can enhance your overall aesthetic and reflect the beauty of spring. Before settling on your final palette, test color swatches on a practice sheet to see how they interact. This way, you can refine your choices and create a cohesive look that truly embodies the spirit of the season.
Step-by-Step Guide to Creating Spring-Inspired French Tips
Now that you have your tools and color palette ready, it’s time to dive into the step-by-step process of creating your spring-inspired French tips. Follow these instructions to achieve a flawless design:
1. Preparation: Start by cleaning your nails thoroughly. Remove any old polish and wash your hands to eliminate oils and dirt. Use nail clippers to shape your nails, then file and buff them to create a smooth surface.
2. Base Coat: Apply a base coat to protect your natural nails and help the polish adhere better. Allow it to dry completely before moving on.
3. Applying the Base Color: Choose a neutral polish that complements your spring palette and apply it evenly across all nails. This will serve as the foundation for your French manicure. Allow it to dry fully.
4. Creating the French Tips: Using a fine nail art brush or a nail striper, dip it into your chosen tip color (traditionally white, but feel free to experiment with colors). Start at one side of the nail and carefully draw a line across the tip, angling it to create a smooth curve. Repeat this process on all your nails, ensuring consistent tip width.
5. Creative Variations: Once your classic French tips are complete, consider adding creative variations. You can opt for an ombre effect by blending two colors at the tips, create floral designs using a dotting tool, or add a touch of glitter for some sparkle.
6. Troubleshooting: If you encounter bubbles or uneven lines, don’t worry! Allow each layer to dry completely before applying the next. For uneven lines, you can tidy up with a small brush dipped in nail polish remover.
By following these steps, you’ll have beautifully crafted spring-inspired French tips that showcase your creativity and style.
Adding Decorative Elements to Your Design
Enhancing your spring nail art with decorative elements can make your design even more unique and fun. Nail art embellishments, such as stickers, gems, and rhinestones, can add a playful touch to your French tips. Here are some techniques to consider:
– Nail Art Embellishments: You can easily incorporate stickers in floral or geometric designs. Apply these after your base and tip colors have dried, securing them with a top coat to ensure longevity.
– Painting Small Designs: If you’re feeling artistic, try painting delicate designs like flowers or butterflies directly onto your nails. Use a fine brush for intricate details and consider using contrasting colors for added impact.
– Nail Tape for Geometric Designs: Nail tape is a fantastic tool for creating geometric patterns. Simply apply tape in your desired pattern on a dry base color, apply a contrasting polish, and remove the tape once dry to reveal clean lines.
– Combining Textures: Experiment with different finishes to add depth to your design. You can mix matte and glossy polishes for a dynamic look. For example, a matte base with glossy tips or vice versa can create an eye-catching effect.
By incorporating these decorative elements, you can elevate your spring-inspired French nail art to a whole new level. The key is to have fun and let your creativity guide you!
Nail Care: Maintaining Your Spring Nail Art
After putting in the effort to create stunning spring-inspired French nail art, it’s crucial to ensure it stays looking fresh and fabulous. Here are some essential tips for maintaining your nail art and keeping your nails healthy:
1. Base and Top Coats: Always use a base coat before applying any polish to protect your natural nails. A high-quality top coat is also essential for sealing your design, providing shine, and enhancing durability.
2. Nail Health: Keep your nails healthy by practicing regular maintenance. This includes filing and shaping your nails to prevent breakage, as well as caring for your cuticles. Moisturize your hands and nails to keep them hydrated and prevent dryness.
3. Regular Maintenance: Schedule regular touch-ups as needed, especially if you notice chips or wear on your tips. A quick application of top coat can help extend the life of your design.
4. Safe Removal: When it’s time to remove your nail art, avoid harsh methods that can damage your nails. Use an acetone-based remover, allowing it to soak on a cotton ball for a few minutes before gently wiping away the polish. Follow up with a nourishing cuticle oil to replenish moisture.
By following these tips, you’ll ensure that your spring nail art remains vibrant and your nails stay healthy, allowing you to enjoy your DIY creations for longer.
Inspiration from Nature: Spring Themes for Nail Art
Spring is the season of renewal and growth, making it a perfect time to draw inspiration from nature for your nail art designs. Here are some nature-inspired themes that can transform your French nail art:
– Floral Designs: Flowers are quintessential symbols of spring. Incorporate small flower motifs on your tips or as accents on your nails. Designs featuring daisies, tulips, or cherry blossoms can add a lovely touch to your manicure.
– Aquatic Themes: Spring often brings thoughts of blooming gardens and sunny days, but it can also evoke images of serene water scenes. Consider using shades of blue and green to create waves or water droplets on your nails, reflecting the refreshing essence of spring.
– Seasonal Events: Incorporate designs that celebrate seasonal events such as Easter or spring picnics. Think pastel colors, cute bunnies, or even colorful eggs to add a festive touch to your nails.
– Popular Trends: Keep an eye on the latest nail art trends for spring. Current styles often include abstract designs, negative space, and vibrant color combinations. You can adapt these trends into your own unique creations.
Drawing inspiration from the beauty of nature around you will not only enhance your nail art but also allow you to feel more connected to the season. Embrace the colors, patterns, and themes that resonate with you to create designs that are both beautiful and meaningful.
Sharing Your Creations and Getting Feedback
Once you’ve crafted your stunning spring-inspired French nail art, it’s time to share your creations with the world! Sharing your nail art can be a fun way to connect with others who appreciate DIY beauty. Here are some tips for showcasing your work:
– Social Media Platforms: Utilize social media platforms like Instagram, Pinterest, and TikTok to share photos of your nail art. Use relevant hashtags to reach a broader audience and connect with fellow nail art enthusiasts.
– Photographing Nail Art: When capturing your nail art, ensure good lighting and a clean background to make your designs pop. Experiment with different angles to showcase intricate details, and consider using close-up shots to highlight textures and embellishments.
– Join Nail Art Communities: Engage with online nail art communities and forums where you can share your creations, get feedback, and find inspiration. These communities often offer support and motivation for improving your skills.
– Creating a Blog or Portfolio: Consider starting a blog or online portfolio to document your nail art journey. This can serve as a creative outlet where you share tutorials, tips, and your design progression.
Sharing your creations not only allows you to celebrate your artistic talents but also invites others to appreciate and learn from your work. Embrace the community and enjoy the feedback!
Conclusion
Creating your own spring-inspired French nail art is a delightful way to embrace the season and express your unique style. With endless possibilities for colors, designs, and techniques, you can let your creativity run wild. The joy of DIY nail art lies in the process—experimenting with different styles, learning new skills, and ultimately showcasing your personal flair.
Remember to have fun during your artistic journey, whether you’re creating a simple classic look or a vibrant, intricate design. Don’t hesitate to share your experiences and creations in the comments; your journey may inspire others to dive into the world of nail art. Embrace the creativity and self-expression that comes with it, and let your nails be a reflection of the beauty and vibrancy of spring!
Frequently Asked Questions
What is the best way to prepare my nails for nail art?
To prepare your nails for nail art, start by removing any old polish and washing your hands thoroughly. Shape your nails with clippers and a file, then buff the surface to create a smooth canvas. Finish with a base coat to protect your natural nails and help the polish adhere better. Proper preparation is key to achieving a professional-looking finish.
How do I choose the right colors for my nail art?
Choosing the right colors for your nail art involves considering seasonal themes and your personal preferences. For spring, opt for soft pastels or vibrant shades that evoke feelings of joy and renewal. Experiment with color combinations, testing swatches on a practice sheet to see how they interact. Think about incorporating your favorite colors and themes that resonate with you.
How can I fix mistakes in my nail art?
If you make a mistake in your nail art, don’t worry! For minor errors, you can use a small brush dipped in nail polish remover to clean up the edges or uneven lines. If a whole section needs to be redone, let the polish dry, then carefully layer more polish over the area. Practice makes perfect, so don’t be discouraged by small mistakes!
What should I do to maintain my nail art?
To maintain your nail art, always use a base coat before applying polish and finish with a top coat to seal your design. Regularly file and shape your nails to prevent breakage, and keep your cuticles well-moisturized. If you notice chips or wear, consider applying a new layer of top coat for an instant refresh.
Can I use regular nail polish for nail art?
Yes, you can use regular nail polish for nail art! However, using specialized nail art polishes can provide better consistency and pigmentation for intricate designs. Regular polish works well for simpler looks or as a base color. The key is to choose polishes that you enjoy and feel comfortable working with to create your unique designs.